Principles, Systems, and Electronics
This handbook provides a detailed study of the sensors and actuators at the heart of modern vehicle electronics. It begins with basic electrical and electronic concepts, introducing the principles and terminology essential for understanding automotive systems.
The book explores sensors and actuators on a system-by-system basis, including:
Fundamentals of electrical engineering, electromagnetic phenomena, and motor principles
Passive and active electronic components, integrated circuits, protection devices, and automotive-grade electronics
Sensor characteristics, signal conditioning, ADCs, PWM and frequency outputs, and interface adaptation
Automotive communication links and protocols, including LIN and SENT
Engine sensors: air mass, pressure, temperature, speed, position, exhaust and emissions-related sensors
Transmission sensors for manual and automatic systems
Steering and suspension sensors for conventional and active systems
Vehicle body and electrical system sensors for comfort, climate, access, and monitoring functions
Engine actuators such as throttle bodies, injectors, turbo actuators, EGR systems, ignition components, and pumps
Transmission, brake, steering, suspension, and body actuators
Identification and coding of electronic components and packages commonly used in automotive applications
The structure and operating principles of each component are explained, with relevant electronic circuitry illustrated. Its system-oriented organization and practical focus make it a valuable reference for understanding, testing, and troubleshooting automotive electronic systems.
Maker Line est un capteur de ligne doté d'un réseau de 5 capteurs IR capable de suivre des lignes de 13 mm à 30 mm de largeur.
L'étalonnage du capteur a également été simplifié. Il n'est pas nécessaire d'ajuster le potentiomètre pour chaque capteur IR. Il vous suffit d'appuyer sur le bouton de calibrage pendant 2 secondes pour accéder au mode de calibrage. Ensuite, vous devez faire glisser les capteurs sur la ligne, appuyer à nouveau sur le bouton et vous êtes prêt à partir.
Les données d'étalonnage sont stockées dans l'EEPROM et restent intactes même lorsque le capteur est éteint. L'étalonnage ne doit donc être effectué qu'une seule fois, sauf si la hauteur du capteur, la couleur de la ligne ou la couleur de fond ont changé.
Maker Line prend également en charge deux sorties : 5 sorties numériques pour l'état de chaque capteur indépendamment, ce qui est similaire au capteur IR classique, mais vous bénéficiez d'un étalonnage facile, et également une sortie analogique, où la tension représente la position de la ligne. La sortie analogique offre également une résolution plus élevée par rapport aux sorties numériques séparées. Ceci est particulièrement utile lorsqu’une grande précision est requise lors de la construction d’un robot suiveur de ligne avec contrôle PID.
Caractéristiques
Tension de fonctionnement : compatible DC 3,3 V et 5 V (avec protection contre l'inversion de polarité)
Largeur de trait recommandée : 13 mm à 30 mm
Couleur de ligne sélectionnable (claire ou foncée)
Distance du capteur (hauteur) : 4 mm à 40 mm (Vcc = 5 V, ligne noire sur surface blanche)
Taux de rafraîchissement du capteur : 200 Hz
Processus d'étalonnage facile
Types de sortie double : 5 sorties numériques représentent chaque état du capteur IR, 1 sortie analogique représente la position de la ligne.
Prend en charge une large gamme de contrôleurs, tels que Arduino, Raspberry Pi, etc.
Téléchargements
Fiche de données
Tutoriel : Construire un robot de suivi de ligne bon marché
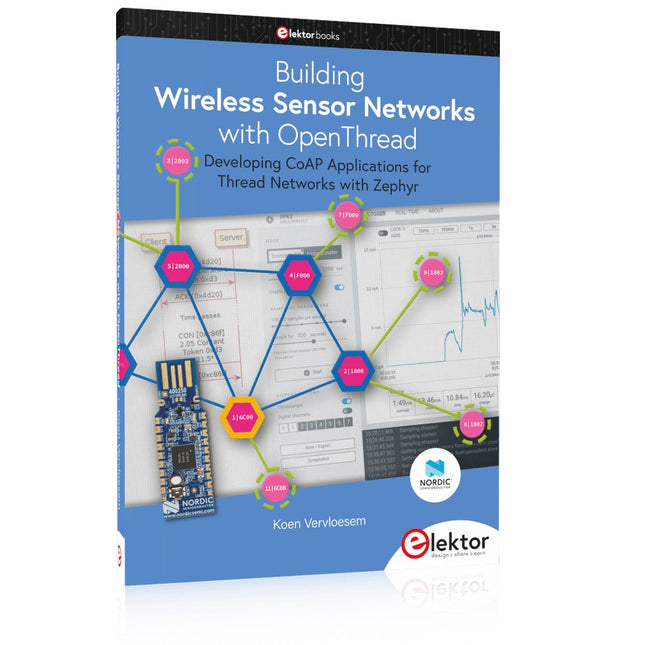
Developing CoAP applications for Thread networks with Zephyr
This book will guide you through the operation of Thread, the setup of a Thread network, and the creation of your own Zephyr-based OpenThread applications to use it. You’ll acquire knowledge on:
The capture of network packets on Thread networks using Wireshark and the nRF Sniffer for 802.15.4.
Network simulation with the OpenThread Network Simulator.
Connecting a Thread network to a non-Thread network using a Thread Border Router.
The basics of Thread networking, including device roles and types, as well as the diverse types of unicast and multicast IPv6 addresses used in a Thread network.
The mechanisms behind network discovery, DNS queries, NAT64, and multicast addresses.
The process of joining a Thread network using network commissioning.
CoAP servers and clients and their OpenThread API.
Service registration and discovery.
Securing CoAP messages with DTLS, using a pre-shared key or X.509 certificates.
Investigating and optimizing a Thread device’s power consumption.
Once you‘ve set up a Thread network with some devices and tried connecting and disconnecting them, you’ll have gained a good insight into the functionality of a Thread network, including its self-healing capabilities. After you’ve experimented with all code examples in this book, you’ll also have gained useful programming experience using the OpenThread API and CoAP.
Principles, Systems, and Electronics
This handbook provides a detailed study of the sensors and actuators at the heart of modern vehicle electronics. It begins with basic electrical and electronic concepts, introducing the principles and terminology essential for understanding automotive systems.
The book explores sensors and actuators on a system-by-system basis, including:
Fundamentals of electrical engineering, electromagnetic phenomena, and motor principles
Passive and active electronic components, integrated circuits, protection devices, and automotive-grade electronics
Sensor characteristics, signal conditioning, ADCs, PWM and frequency outputs, and interface adaptation
Automotive communication links and protocols, including LIN and SENT
Engine sensors: air mass, pressure, temperature, speed, position, exhaust and emissions-related sensors
Transmission sensors for manual and automatic systems
Steering and suspension sensors for conventional and active systems
Vehicle body and electrical system sensors for comfort, climate, access, and monitoring functions
Engine actuators such as throttle bodies, injectors, turbo actuators, EGR systems, ignition components, and pumps
Transmission, brake, steering, suspension, and body actuators
Identification and coding of electronic components and packages commonly used in automotive applications
The structure and operating principles of each component are explained, with relevant electronic circuitry illustrated. Its system-oriented organization and practical focus make it a valuable reference for understanding, testing, and troubleshooting automotive electronic systems.
Developing CoAP applications for Thread networks with Zephyr
This book will guide you through the operation of Thread, the setup of a Thread network, and the creation of your own Zephyr-based OpenThread applications to use it. You’ll acquire knowledge on:
The capture of network packets on Thread networks using Wireshark and the nRF Sniffer for 802.15.4.
Network simulation with the OpenThread Network Simulator.
Connecting a Thread network to a non-Thread network using a Thread Border Router.
The basics of Thread networking, including device roles and types, as well as the diverse types of unicast and multicast IPv6 addresses used in a Thread network.
The mechanisms behind network discovery, DNS queries, NAT64, and multicast addresses.
The process of joining a Thread network using network commissioning.
CoAP servers and clients and their OpenThread API.
Service registration and discovery.
Securing CoAP messages with DTLS, using a pre-shared key or X.509 certificates.
Investigating and optimizing a Thread device’s power consumption.
Once you‘ve set up a Thread network with some devices and tried connecting and disconnecting them, you’ll have gained a good insight into the functionality of a Thread network, including its self-healing capabilities. After you’ve experimented with all code examples in this book, you’ll also have gained useful programming experience using the OpenThread API and CoAP.
40+ Projects using Arduino, Raspberry Pi and ESP32
This book is about developing projects using the sensor-modules with Arduino Uno, Raspberry Pi and ESP32 microcontroller development systems. More than 40 different sensors types are used in various projects in the book. The book explains in simple terms and with tested and fully working example projects, how to use the sensors in your project. The projects provided in the book include the following:
Changing LED brightness
RGB LEDs
Creating rainbow colours
Magic wand
Silent door alarm
Dark sensor with relay
Secret key
Magic light cup
Decoding commercial IR handsets
Controlling TV channels with IT sensors
Target shooting detector
Shock time duration measurement
Ultrasonic reverse parking
Toggle lights by clapping hands
Playing melody
Measuring magnetic field strength
Joystick musical instrument
Line tracking
Displaying temperature
Temperature ON/OFF control
Mobile phone-based Wi-Fi projects
Mobile phone-based Bluetooth projects
Sending data to the Cloud
The projects have been organized with increasing levels of difficulty. Readers are encouraged to tackle the projects in the order given. A specially prepared sensor kit is available from Elektor. With the help of this hardware, it should be easy and fun to build the projects in this book.
Il s'agit d'une solution de refroidissement haute performance conçue pour dissiper efficacement la chaleur et garantir des températures de fonctionnement optimales pour le Raspberry Pi. C'est un accessoire indispensable pour les utilisateurs qui souhaitent améliorer les performances et la longévité de leur appareil Raspberry Pi.
La conception compacte du kit de refroidissement par eau pour Raspberry Pi 5 lui permet d'être installé de manière transparente en haut et en bas du Raspberry Pi 5, assurant un transfert de chaleur efficace et protégeant parfaitement le bas du Raspberry Pi. Son processus d'installation simple élimine le besoin de câblage complexe ou d'outils supplémentaires, ce qui le rend convivial aussi bien pour les débutants que pour les passionnés de Raspberry Pi expérimentés.
Avec ses puissantes performances de refroidissement, le kit de refroidissement par eau pour Raspberry Pi 5 permet de dissiper efficacement la chaleur générée par le Raspberry Pi lors de tâches intensives ou d'une utilisation prolongée. Cela aide à prévenir la surchauffe et garantit des performances stables. Un refroidissement efficace par eau vous permettra de connecter plusieurs cartes Raspberry Pi à un ensemble de dispositifs de refroidissement. Lorsque vous utilisez Raspberry Pi dans un cluster, vous pouvez utiliser un ensemble d'appareils refroidis par eau pour refroidir efficacement plusieurs cartes Raspberry Pi.
Caractéristiques
Conçu pour Raspberry Pi : spécialement conçu pour Raspberry Pi 5, ouverture de moule 1:1, couvrant toutes les sources de chaleur, y compris le processeur, le Wi-Fi, la puce d'alimentation et l'eMMC.
Performances de refroidissement : dissipe efficacement la chaleur générée par le Raspberry Pi, garantissant des températures de fonctionnement optimales et évitant la surchauffe.
Facile à utiliser : la conception intégrée de la pompe à eau et du ventilateur de refroidissement est pratique à installer pour les utilisateurs.
Éclairage de couleur RVB : des lumières de couleur RVB sont installées aux emplacements du ventilateur et de la pompe à eau.
Inclus
1x kit de refroidissement par eau
1x radiateur de refroidissement par eau
1x dissipateur thermique noir
2x tuyau en silicone
1x adaptateur secteur 12 V/2 A (États-Unis)
4x Vis hexagonale M2,5x10
1x clé hexagonale à clé en L
ModbusRTU and ModbusTCP examples with the Arduino Uno and ESP8266
Introduction to PLC programming with OpenPLC, the first fully open source Programmable Logic Controller on the Raspberry Pi, and Modbus examples with Arduino Uno and ESP8266
PLC programming is very common in industry and home automation. This book describes how the Raspberry Pi 4 can be used as a Programmable Logic Controller. Before taking you into the programming, the author starts with the software installation on the Raspberry Pi and the PLC editor on the PC, followed by a description of the hardware.
You'll then find interesting examples in the different programming languages complying with the IEC 61131-3 standard. This manual also explains in detail how to use the PLC editor and how to load and execute the programs on the Raspberry Pi. All IEC languages are explained with examples, starting with LD (Ladder Diagram) over ST (Structured Control Language) to SFC (Special Function Chart). All examples can be downloaded from the author's website.
Networking gets thorough attention too. The Arduino Uno and the ESP8266 are programmed as ModbusRTU or ModbusTCP modules to get access to external peripherals, reading sensors and switching electrical loads. I/O circuits complying with the 24 V industry standard may also be of interest for the reader.
The book ends with an overview of commands for ST and LD. After reading the book, the reader will be able to create his own controllers with the Raspberry Pi.
Learn programming for Alexa devices, extend it to smart home devices and control the Raspberry Pi
The book is split into two parts: the first part covers creating Alexa skills and the second part, designing Internet of Things and Smart Home devices using a Raspberry Pi.
The first chapters describe the process of Alexa communication, opening an Amazon account and creating a skill for free. The operation of an Alexa skill and terminology such as utterances, intents, slots, and conversations are explained. Debugging your code, saving user data between sessions, S3 data storage and Dynamo DB database are discussed.
In-skill purchasing, enabling users to buy items for your skill as well as certification and publication is outlined. Creating skills using AWS Lambda and ASK CLI is covered, along with the Visual Studio code editor and local debugging. Also covered is the process of designing skills for visual displays and interactive touch designs using Alexa Presentation Language.
The second half of the book starts by creating a Raspberry Pi IoT 'thing' to control a robot from your Alexa device. This covers security issues and methods of sending and receiving MQTT messages between an Alexa device and the Raspberry Pi.
Creating a smart home device is described including forming a security profile, linking with Amazon, and writing a Lambda function that gets triggered by an Alexa skill. Device discovery and on/off control is demonstrated.
Next, readers discover how to control a smart home Raspberry Pi display from an Alexa skill using Simple Queue Service (SQS) messaging to switch the display on and off or change the color.
A node-RED design is discussed from the basic user interface right up to configuring MQTT nodes. MQTT messages sent from a user are displayed on a Raspberry Pi.
A chapter discusses sending a proactive notification such as a weather alert from a Raspberry Pi to an Alexa device. The book concludes by explaining how to create Raspberry Pi as a stand-alone Alexa device.
La plupart des gens sont de plus en plus confrontés aux applications de l’intelligence artificielle (IA). Les classements de musique ou de vidéo, les systèmes de navigation, les conseils d'achat, etc. reposent sur des méthodes qui peuvent être attribuées à ce domaine.
Le terme intelligence artificielle a été inventé en 1956 lors d’une conférence internationale connue sous le nom de Dartmouth Summer Research Project. Une approche fondamentale consistait à modéliser le fonctionnement du cerveau humain et à construire des systèmes informatiques avancés sur cette base. Bientôt, le fonctionnement de l’esprit humain devrait être clair. Le transférer sur une machine n’était considéré qu’une petite étape. Cette notion s'est avérée un peu trop optimiste. Néanmoins, les progrès de l’IA moderne, ou plutôt de sa sous-spécialité appelée Machine Learning (ML), ne peuvent plus être niés.
Dans ce livre, plusieurs systèmes différents seront utilisés pour connaître plus en détail les méthodes d’apprentissage automatique. En plus du PC, le Raspberry Pi et le Maixduino démontreront leurs capacités dans les différents projets. Outre des applications telles que la reconnaissance d'objets et de visages, des systèmes pratiques tels que des détecteurs de bouteilles, des compteurs de personnes ou un « œil qui parle » seront également créés.
Ce dernier est capable de décrire acoustiquement des objets ou des visages détectés automatiquement. Par exemple, si un véhicule se trouve dans le champ de vision de la caméra connectée, l'information « Je vois une voiture ! est émis via une parole générée électroniquement. De tels appareils sont des exemples très intéressants de la manière dont, par exemple, les personnes aveugles ou gravement malvoyantes peuvent également bénéficier des systèmes d’IA.
The Arduino Uno is an open-source microcontroller development system encompassing hardware, an Integrated Development Environment (IDE), and a vast number of libraries. It is supported by an enormous community of programmers, electronic engineers, enthusiasts, and academics. The libraries in particular really smooth Arduino programming and reduce programming time. What’s more, the libraries greatly facilitate testing your programs since most come fully tested and working.
The Raspberry Pi 4 can be used in many applications such as audio and video media devices. It also works in industrial controllers, robotics, games, and in many domestic and commercial applications. The Raspberry Pi 4 also offers Wi-Fi and Bluetooth capability which makes it great for remote and Internet-based control and monitoring applications.
This book is about using both the Raspberry Pi 4 and the Arduino Uno in PID-based automatic control applications. The book starts with basic theory of the control systems and feedback control. Working and tested projects are given for controlling real-life systems using PID controllers. The open-loop step time response, tuning the PID parameters, and the closed-loop time response of the developed systems are discussed together with the block diagrams, circuit diagrams, PID controller algorithms, and the full program listings for both the Raspberry Pi and the Arduino Uno.
The projects given in the book aim to teach the theory and applications of PID controllers and can be modified easily as desired for other applications. The projects given for the Raspberry Pi 4 should work with all other models of Raspberry Pi family.
The book covers the following topics:
Open-loop and closed-loop control systems
Analog and digital sensors
Transfer functions and continuous-time systems
First-order and second-order system time responses
Discrete-time digital systems
Continuous-time PID controllers
Discrete-time PID controllers
ON-OFF temperature control with Raspberry Pi and Arduino Uno
PID-based temperature control with Raspberry Pi and Arduino Uno
PID-based DC motor control with Raspberry Pi and Arduino Uno
PID-based water level control with Raspberry Pi and Arduino Uno
PID-based LED-LDR brightness control with Raspberry Pi and Arduino Uno
This book details the use of the ARM Cortex-M family of processors and the Arduino Uno in practical CAN bus based projects. Inside, it gives a detailed introduction to the architecture of the Cortex-M family whilst providing examples of popular hardware and software development kits. Using these kits helps to simplify the embedded design cycle considerably and makes it easier to develop, debug, and test a CAN bus based project. The architecture of the highly popular ARM Cortex-M processor STM32F407VGT6 is described at a high level by considering its various modules. In addition, the use of the mikroC Pro for ARM and Arduino Uno CAN bus library of functions are described in detail.
This book is written for students, for practising engineers, for hobbyists, and for everyone else who may need to learn more about the CAN bus and its applications. The book assumes that the reader has some knowledge of basic electronics. Knowledge of the C programming language will be useful in later chapters of the book, and familiarity with at least one microcontroller will be an advantage, especially if the reader intends to develop microcontroller based projects using CAN bus.
The book should be useful source of reference to anyone interested in finding an answer to one or more of the following questions:
What bus systems are available for the automotive industry?
What are the principles of the CAN bus?
What types of frames (or data packets) are available in a CAN bus system?
How can errors be detected in a CAN bus system and how reliable is a CAN bus system?
What types of CAN bus controllers are there?
What are the advantages of the ARM Cortex-M microcontrollers?
How can one create a CAN bus project using an ARM microcontroller?
How can one create a CAN bus project using an Arduino microcontroller?
How can one monitor data on the CAN bus?