Caractéristiques
Microcontrôleur ATmega328 avec chargeur de démarrage Optiboot
Compatible avec le bouclier R3
Convertisseur série-USB CH340C
Cavalier de niveau de tension de 3,3 V à 5 V
Cavaliers A4/A5
Régulateur de tension AP2112
Rubrique FAI
Tension d'entrée : 7 V - 15 V
1 connexion Qwiic
Vitesse d'horloge de 16 MHz
Mémoire Flash 32 Ko
Construction entièrement CMS
bouton de réinitialisation amélioré
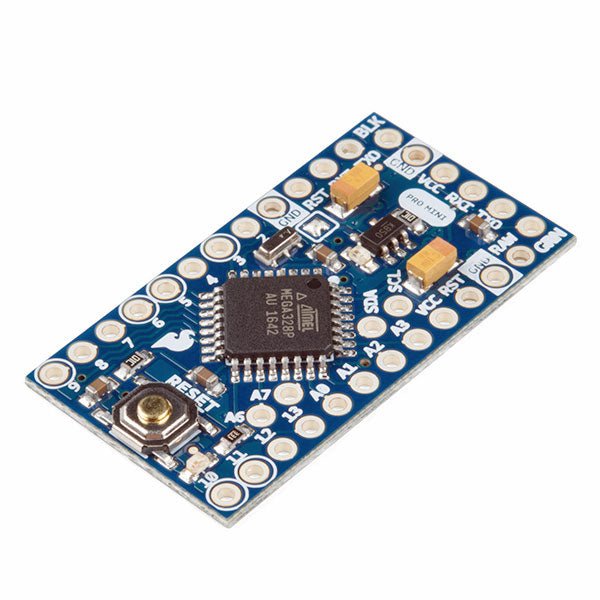
L'Arduino Pro Mini est une carte à microcontrôleur basée sur l' ATmega328P.
Elle dispose de 14 broches d'entrée/sortie numériques (dont 6 peuvent être utilisées comme sorties PWM), de 6 entrées analogiques, d'un résonateur embarqué, d'un bouton de réinitialisation et de trous pour monter des connecteurs. Un connecteur à six broches peut être connectée à un câble FTDI ou à une carte breakout de Sparkfun pour fournir une alimentation et une communication USB à la carte.
L'Arduino Pro Mini est destiné à des montages semi-permanents sur des dispositifs ou dans des expositions. La carte est livrée sans connecteurs, ce qui permet d'utiliser différents types de connecteurs ou de souder directement les fils. La disposition des broches est compatible avec celle de l'Arduino Mini.
Spécifications
Microcontrôleur
ATmega328P
Alimentation de la carte
5-12 V
Tension de fonctionnement du circuit
5 V
Broches E/S numériques
14
Broches PWM
6
UART
1
SPI
1
I²C
1
Broches d'entrée analogiques
6
Interruptions externes
2
Courant continu par broche d'E/S
40 mA
Mémoire flash
32 Ko dont 2 Ko utilisés par le bootloader
SRAM
2 Ko
EEPROM
1 KB
Fréquence d'horloge
16 MHz
Dimensions
18 x 33,3 mm
Téléchargements
Fichiers Eagle
Schémas
Branchez un lecteur dans les en-têtes, utilisez un câble Qwiic, scannez votre étiquette d’identification 125kHz et l’ID 32 bits unique s’affichera à l’écran. L’appareil est livré avec une DEL de lecture et un buzzer, mais ne vous inquiétez pas, il y a un cavalier que vous pouvez couper pour désactiver le buzzer si vous voulez. En utilisant le système Qwiic pratique de SparkFun, aucune soudure n’est nécessaire pour le connecter au reste de votre système. Cependant, nous avons encore des broches espacées de 0,1' si vous préférez utiliser une platine d'expérimentation. En utilisant l’ATtiny84A de bord, le Qwiic RFID prend l’étiquette d’identification de six octets de votre carte RFID 125kHz, lui attache un horodatage, et le met sur une pile qui contient jusqu’à 20 scans RFID uniques à la fois. Cette information est facile à obtenir avec quelques commandes I2C simples.
This complete Arduino Uno-based microcontroller programming course features a textbook, a component kit, hands-on projects, and a comprehensive online course with simulations. It is ideal for step-by-step learning of embedded systems programming with Arduino using a practical, hands-on approach.
A Practical Introduction to Embedded Systems with the Arduino Uno
This course is designed for people who are new to embedded systems and looking for a structured, example-driven way to get started.
A kit of parts comprising LEDs and resistors, switches, sensors and actuators, displays, a breadboard and wires, and more is included. These are used in the course to illustrate example applications.
No prior experience with Arduino or embedded development is required. Each section features hands-on examples and mini projects designed to reinforce key concepts and inspire deeper exploration. By the end of the course, you’ll be able not only to reproduce the examples but also to build on them with your own ideas and applications.
What Will You Learn?
Microcontroller programming with Arduino using the Uno R3 board
Working with Digital I/O, read buttons and encoders, control LEDs and relays
Read analog inputs, voltages, and analog sensors
Generating analog output signals and PWM
Use serial communication like UART, I²C and SPI to control displays and read digital sensors and SD cards
Managing time
Working with interrupts
Real-time sensor input and control via buttons, LEDs, and displays
Control actuators like relays and servo motors
Who Is It For?
Students and self-learners exploring embedded systems
Makers and IoT enthusiasts looking to improve their hardware skills
Educators and trainers seeking ready-to-teach material
What's Inside the Box?
Uno R3 microcontroller board + USB cable
Book: Programming Microcontrollers in C/C++ Using Arduino
Component Box:
2× LED, red, 5 mm
LED, green, 5 mm
3× Resistor, 470 Ω, 0.25 W
LDR
Potentiometer, 10 kΩ, linear
Pushbutton
Rotary encoder module
Relay module
DHT22 Humidity & Temperature Sensor
TM1637-compatible 4-digit 7-segment display
MPU-6050 IMU with headers
SSD1306-compatible I²C OLED display
Micro SD card adapter with header
Buzzer
SG90 Micro Servo
ILI9341-compatible SPI 240×320 TFT display
20× Jumper wires
Breadboard
Access to the full course on the Elektor Academy Pro Learning Platform
Downloadable project files for every module
All Programming Courses (and differences in content)
Arduino
Raspberry Pi Pico with Arduino C/C++
ESP32 with Arduino C/C++
Raspberry Pi Pico with MicroPython
ESP32 with MicroPython
Uno R3
Raspberry Pi Pico
ESP32
Raspberry Pi Pico
ESP32
Book: Programming Microcontrollers in C/C++ Using Arduino
Book: Programming Microcontrollers in MicroPython
40-piece Component Box
Access to Full Course
Access to Full Course
Access to Full Course
Access to Full Course
Access to Full Course
This complete ESP32 microcontroller programming course features a textbook, a component kit, hands-on projects, and a comprehensive online course with simulations. It is ideal for step-by-step learning of embedded systems programming with Arduino using a practical, hands-on approach.
A Practical Introduction to Embedded Systems with the ESP32
This course is designed for people who are new to embedded systems and looking for a structured, example-driven way to get started.
A kit of parts comprising LEDs and resistors, switches, sensors and actuators, displays, a breadboard and wires, and more is included. These are used in the course to illustrate example applications.
No prior experience with Arduino or embedded development is required. Each section features hands-on examples and mini projects designed to reinforce key concepts and inspire deeper exploration. By the end of the course, you’ll be able not only to reproduce the examples but also to build on them with your own ideas and applications.
What Will You Learn?
Microcontroller programming with the ESP32 using the Arduino IDE
Working with Digital I/O, read buttons and encoders, control LEDs and relays
Read analog inputs, voltages, and analog sensors
Generating analog output signals and PWM
Use serial communication like UART, I²C and SPI to control displays and read digital sensors and SD cards
Managing time
Working with interrupts
Real-time sensor input and control via buttons, LEDs, and displays
Control actuators like relays and servo motors
Who Is It For?
Students and self-learners exploring embedded systems
Makers and IoT enthusiasts looking to improve their hardware skills
Educators and trainers seeking ready-to-teach material
What's Inside the Box?
ESP32 microcontroller board + USB cable
Book: Programming Microcontrollers in C/C++ Using Arduino
Component Box:
2× LED, red, 5 mm
LED, green, 5 mm
3× Resistor, 470 Ω, 0.25 W
LDR
Potentiometer, 10 kΩ, linear
Pushbutton
Rotary encoder module
Relay module
DHT22 Humidity & Temperature Sensor
TM1637-compatible 4-digit 7-segment display
MPU-6050 IMU with headers
SSD1306-compatible I²C OLED display
Micro SD card adapter with header
Buzzer
SG90 Micro Servo
ILI9341-compatible SPI 240×320 TFT display
20× Jumper wires
Breadboard
Access to the full course on the Elektor Academy Pro Learning Platform
Downloadable project files for every module
All Programming Courses (and differences in content)
Arduino
Raspberry Pi Pico with Arduino C/C++
ESP32 with Arduino C/C++
Raspberry Pi Pico with MicroPython
ESP32 with MicroPython
Uno R3
Raspberry Pi Pico
ESP32
Raspberry Pi Pico
ESP32
Book: Programming Microcontrollers in C/C++ Using Arduino
Book: Programming Microcontrollers in MicroPython
40-piece Component Box
Access to Full Course
Access to Full Course
Access to Full Course
Access to Full Course
Access to Full Course
Technology is constantly changing. New microcontrollers become available every year. The one thing that has stayed the same is the C programming language used to program these microcontrollers. If you would like to learn this standard language to program microcontrollers, then this book is for you!
Arduino is the hardware platform used to teach the C programming language as Arduino boards are available worldwide and contain the popular AVR microcontrollers from Atmel.
Atmel Studio is used as the development environment for writing C programs for AVR microcontrollers. It is a full-featured integrated development environment (IDE) that uses the GCC C software tools for AVR microcontrollers and is free to download.
At a glance:
Start learning to program from the very first chapter
No programming experience is necessary
Learn by doing – type and run the example programs
A fun way to learn the C programming language
Ideal for electronic hobbyists, students and engineers wanting to learn the C programming language in an embedded environment on AVR microcontrollers
Use the free full-featured Atmel Studio IDE software for Windows
Write C programs for 8-bit AVR microcontrollers as found on the Arduino Uno and MEGA boards
Example code runs on Arduino Uno and Arduino MEGA 2560 boards and can be adapted to run on other AVR microcontrollers or boards
Use the AVR Dragon programmer/debugger in conjunction with Atmel Studio to debug C programs
This complete Raspberry Pi Pico microcontroller programming course features a textbook, a component kit, hands-on projects, and a comprehensive online course with simulations. It is ideal for step-by-step learning of embedded systems programming with Arduino using a practical, hands-on approach.
A Practical Introduction to Embedded Systems with the Raspberry Pi Pico
This course is designed for people who are new to embedded systems and looking for a structured, example-driven way to get started.
A kit of parts comprising LEDs and resistors, switches, sensors and actuators, displays, a breadboard and wires, and more is included. These are used in the course to illustrate example applications.
No prior experience with Arduino or embedded development is required. Each section features hands-on examples and mini projects designed to reinforce key concepts and inspire deeper exploration. By the end of the course, you’ll be able not only to reproduce the examples but also to build on them with your own ideas and applications.
What Will You Learn?
Microcontroller programming in C/C++ with the Raspberry Pi Pico using the Arduino IDE
Working with Digital I/O, read buttons and encoders, control LEDs and relays
Read analog inputs, voltages, and analog sensors
Generating analog output signals and PWM
Use serial communication like UART, I²C and SPI to control displays and read digital sensors and SD cards
Managing time
Working with interrupts
Real-time sensor input and control via buttons, LEDs, and displays
Control actuators like relays and servo motors
Who Is It For?
Students and self-learners exploring embedded systems
Makers and IoT enthusiasts looking to improve their hardware skills
Educators and trainers seeking ready-to-teach material
What's Inside the Box?
Raspberry Pi Pico microcontroller board + USB cable
Book: Programming Microcontrollers in C/C++ Using Arduino
Component Box:
2× LED, red, 5 mm
LED, green, 5 mm
3× Resistor, 470 Ω, 0.25 W
LDR
Potentiometer, 10 kΩ, linear
Pushbutton
Rotary encoder module
Relay module
DHT22 Humidity & Temperature Sensor
TM1637-compatible 4-digit 7-segment display
MPU-6050 IMU with headers
SSD1306-compatible I²C OLED display
Micro SD card adapter with header
Buzzer
SG90 Micro Servo
ILI9341-compatible SPI 240×320 TFT display
20× Jumper wires
Breadboard
Access to the full course on the Elektor Academy Pro Learning Platform
Downloadable project files for every module
All Programming Courses (and differences in content)
Arduino
Raspberry Pi Pico with Arduino C/C++
ESP32 with Arduino C/C++
Raspberry Pi Pico with MicroPython
ESP32 with MicroPython
Uno R3
Raspberry Pi Pico
ESP32
Raspberry Pi Pico
ESP32
Book: Programming Microcontrollers in C/C++ Using Arduino
Book: Programming Microcontrollers in MicroPython
40-piece Component Box
Access to Full Course
Access to Full Course
Access to Full Course
Access to Full Course
Access to Full Course
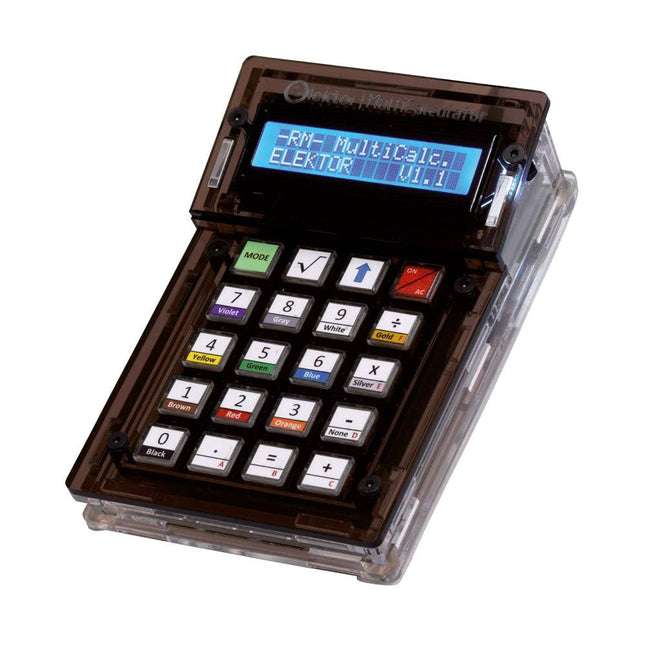
Le kit Elektor MultiCalculator est une calculatrice multifonction basée sur Arduino qui va au-delà des calculs de base. Il offre 22 fonctions, dont la mesure de la lumière et de la température, l'analyse différentielle de la température et le décodage de la télécommande IR NEC. L'Elektor MultiCalculator est un outil pratique à utiliser dans vos projets ou à des fins pédagogiques.
Le kit comprend un module Pro Mini comme unité de calcul. Le PCB est facile à assembler à l’aide de composants traversants. Le boîtier se compose de 11 panneaux acryliques et de matériel de montage pour un assemblage facile. De plus, l'appareil est équipé d'un écran LCD alphanumérique 16x2, de 20 boutons et de capteurs de température.
L'Elektor MultiCalculator est programmable avec l'IDE Arduino via un connecteur PCB à 6 voies. La calculatrice peut être programmée avec un adaptateur de programmation et elle est alimentée via USB-C.
Modes de fonctionnement
Calculatrice
Code de résistance à 4 anneaux
Code de résistance à 5 anneaux
Conversion de décimal en hexadécimal et caractères (ASCII)
Conversion d'hexadécimaux en décimaux et caractères (ASCII)
Conversion de décimal en binaire et caractères (ASCII)
Conversion binaire en décimal et hexadécimal
Calcul de Hz, nF, réactance capacitive (XC)
Calcul de Hz, µH, réactance inductive (XL)
Calcul de la résistance de deux résistances connectées en parallèle
Calcul de la résistance de deux résistances connectées en série
Calcul d'une résistance parallèle inconnue
Mesure de la température
Mesure différentielle de température T1 et T2 et Delta(δ)
Mesure de la lumière
Chronomètre avec fonction temps au tour
Compteur d'articles
Décodage de la télécommande IR NEC
Conversion AWG (American Wire Gauge)
Lancer les dés
Personnaliser le message de démarrage
Étalonnage de la température
Spécifications
Langues des menus : Anglais, néerlandais
Dimensions : 92 x 138 x 40 mm
Durée de construction : environ 5 heures
Inclus
Composants PCB et traversants
Feuilles acryliques prédécoupées avec toutes les pièces mécaniques
Module microcontrôleur Pro Mini (ATmega328/5 V/16 MHz)
Adaptateur de programmation
Capteurs de température étanches
Câble USB-C
Téléchargements
Software
Arduino Micro contient tout ce qui est nécessaire pour le fonctionnement du microcontrôleur ; il suffit de le connecter à un ordinateur avec un câble micro USB pour commencer. Il a un facteur de forme lui permettant d'être facilement placé sur une plaque à essai.
La carte Micro est similaire à l'Arduino Leonardo. L'ATmega32U4 dispose d'une communication USB intégrée, éliminant le besoin d'un processeur secondaire. Cela permet à la carte Micro d'apparaître à un ordinateur connecté comme une souris et un clavier, en plus d'un port série virtuel (CDC)/ port COM.
Microcontrôleur
ATmega32U4
Tension de fonctionnement
5 V
Tension d'entrée
7 V - 12 V
Broches d'entrées analogiques
12
Broches PWM
7
Broche E/S CC
20
Courant continu par broche E/S
20 mA
Courant continu pour la broche de 3,3 V
50 mA
Memoire Flash
32 KB of which 4 KB utilisé par le bootloader
SRAM
2.5 KB
EEPROM
1 KB
Fréquence d'horloge
16 MHz
LED_Builtin
13
Longeur
45 mm
Largeur
18 mm
Poids
13 g
Cette clé USB contient une sélection de plus de 300 articles liés à Arduino publiés dans le magazine Elektor. Le contenu comprend à la fois des articles de fond et des projets sur les sujets suivants :
Développement logiciel et matériel : tutoriels sur le développement logiciel avec l’IDE Arduino, Atmel Studio, les shield, et les concepts essentiels de programmation.
Apprentissage : le Microcontroller Bootcamp propose une approche structurée pour programmer des systèmes embarqués.
Acquisition et mesure de données : projets comme un enregistreur de données 16 bits, un tachymètre pour tour, et un analyseur de réseau électrique pour capturer et analyser des signaux en temps réel.
Communication sans fil : apprenez à mettre en œuvre des réseaux sans fil, créer une interface Android, et communiquer efficacement avec des microcontrôleurs.
Robotique et automatisation : le Arduino Nano Robot Controller, des cartes de support pour l'automatisation, et l'exploration de divers shield Arduino pour enrichir les fonctionnalités.
Projets à construire soi-même : Des projets uniques tels qu’un projecteur laser, une horloge et un thermomètre Numitron, un récepteur TBF, Theremino, et des interfaces LED tactiles mettent en valeur des applications créatives.
Que vous soyez débutant ou expérimenté, cette collection est une ressource précieuse pour apprendre, expérimenter et repousser les limites de la technologie Arduino.
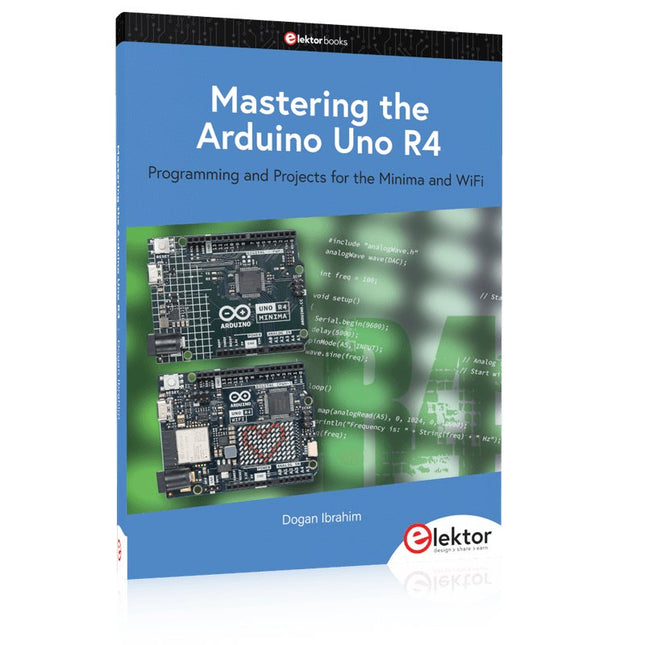
Programming and Projects for the Minima and WiFi
Based on the low-cost 8-bit ATmega328P processor, the Arduino Uno R3 board is likely to score as the most popular Arduino family member, and this workhorse has been with us for many years. Eleven years later, the long-overdue successor, the Arduino Uno R4, was released. It is built around a 48 MHz, 32-bit Arm Cortex-M4 microcontroller and provides significantly expanded SRAM and Flash memory. Additionally, a higher-precision ADC and a new DAC are added to the design. The Uno R4 board also supports the CAN Bus with an interface.
Two versions of the board are available: Uno R4 Minima, and Uno R4 WiFi. This book is about using these new boards to develop many different and interesting projects with just a handful of parts and external modules. All projects described in the book have been fully tested on the Uno R4 Minima or the Uno R4 WiFi board, as appropriate.
The project topics include the reading, control, and driving of many components and modules in the kit as well as on the relevant Uno R4 board, including
LEDs
7-segment displays (using timer interrupts)
LCDs
Sensors
RFID Reader
4x4 Keypad
Real-time clock (RTC)
Joystick
8×8 LED matrix
Motors
DAC (Digital-to-analog converter)
LED matrix
WiFi connectivity
Serial UART
CAN bus
Infrared controller and receiver
Simulators
… all in creative and educational ways with the project operation and associated software explained in great detail.
,
par Saad Imtiaz
SparkFun Thing Plus Matter (MGM240P) : Une carte de développement IoT polyvalente basée sur "Matter" (Essai)
La "SparkFun Thing Plus Matter - MGM240P" est une carte de développement polyvalente et riche en fonctionnalités, conçue pour réaliser des appareils IoT basés sur...