Sprachsteuerung von IoT-Projekten mit Amazon Alexa gibt dem Leser einen tiefen Einblick in die Technik der Sprachsteuerung am Beispiel von Amazon Alexa. Es erklärt detailliert Schritt für Schritt, wie man Raspberry Pi, ESP8266/32 und Arduino mit einem Sprachassistenten verbindet und steuert. Dieses geschieht anhand von Projekten aus den Bereichen Hausautomation und Robotik.
Der Leser erfährt, wie man Heizkessel, Roboter und Gartenhäuser mit dieser modernen Mensch-Maschine-Schnittstelle kommandieren kann. Der Autor Walter Trojan führt dabei den Leser in die vielschichtige Welt der Amazon Web Services ein, wo er neben dem Alexa Skills Kit weitere Module wie AWS Lambda und IoT Core kennenlernt.
Das erwartet den Leser:
Kapitel 1: Sprachassistenten setzen sich durch
Kapitel 2: Alexa intern
Kapitel 3: Der erste Alexa Skill
Kapitel 4: Alexa Skills für Fortgeschrittene
Kapitel 5: Erster Hardware-Skill auf Raspberry Pi
Kapitel 6: Auch Alexa liebt die Arduino-IDE
Kapitel 7: Hacks mit Schaltern
Kapitel 8: Alexa steuert ein Gartenhaus
Kapitel 9: Auch Roboter gehorchen Alexa
Kapitel 10: Alexa geht fremd
With Examples for Arduino UNO, Raspberry Pi Pico and ESP32
Programming small electronic systems has never been more accessible. Tasks that once demanded expensive tools, specialized hardware, and deep electrical engineering expertise can now be tackled with low-cost development boards and approachable software. At the centre of this shift is the Arduino environment, which provides a unified and familiar way to program a wide range of microcontroller platforms—from classic AVR boards like the Arduino UNO to modern ARM-based boards such as the Raspberry Pi Pico, and powerful Wi-Fi-enabled devices like the ESP32.
This book introduces embedded programming through the core idea that defines all microcontrollers: reading inputs, processing information, and controlling outputs in a predictable loop. The Arduino environment abstracts much of the hardware complexity, allowing you to focus on behaviour rather than implementation details. With just a few lines of code, you can blink LEDs, read sensors, control motors, and communicate with other devices.
While the Arduino UNO, Raspberry Pi Pico, and ESP32 boards differ greatly in performance and features, they share the same fundamental building blocks: digital and analog I/O, timers, serial communication, PWM, interrupts, and power management. Learning these concepts within the Arduino framework builds skills that transfer easily across platforms and scale toward more advanced applications.
By exploring multiple boards while maintaining a consistent programming approach, this book helps you progress from simple experiments to confidently produce well-structured designs—showing that embedded development can be both practical and enjoyable.
Einführung in die SPS-Programmierung mit dem Open-Source-Projekt auf dem Raspberry Pi und Modbus-Beispiele mit dem Arduino Uno und ESP8266
Die SPS-Programmierung ist heute in der Industrie und in der Hausautomation sehr weit verbreitet. In diesem Buch beschreibt der Autor, wie der Raspberry Pi 4 als SPS eingesetzt werden kann. Angefangen mit der Softwareinstallation auf dem Raspberry Pi und dem SPS-Editor auf dem PC geht es nach einer Beschreibung der Hardware an das Programmieren.
Es folgen interessante Beispiele nach IEC 61131-3 in den verschiedenen Programmiersprachen. Ausführlich wird auch erklärt, wie der SPS-Editor benutzt wird und wie die Programme auf den Raspberry Pi geladen und ausgeführt werden. Angefangen mit der Programmierung mit KOP (Kontaktplan) über ST (Structured Control Language) bis zu AS (Special Function Chart) werden alle IEC-Sprachen mit Beispielen behandelt. Diese können auf der Website des Autors heruntergeladen werden.
Auch die Vernetzung kommt nicht zu kurz. Der Arduino Uno und der ESP8266 werden als ModbusRTU- bzw. ModbusTCP-Module programmiert, um Zugriff auf externe Peripherie zu erhalten. Damit ist es möglich, Sensoren einzulesen und Verbraucher zu schalten. Interessant dürften auch E/A-Schaltungen sein, die dem 24V-Industriestandard entsprechen.
Befehlsübersichten für ST und KOP runden das Buch ab.
Nach dem Durcharbeiten des Buches ist der Leser in der Lage, eigene SPS-Steuerungen mit dem Raspberry Pi zu verwirklichen.
Le kit QAV250 est le moyen idéal pour commencer à développer sur PX4 ou Ardupilot. Il associe un cadre de course 250 en fibre de carbone et des composants électroniques essentiels au mini pilote automatique Pixhawk 6C. Le kit est facile à assembler. Aucune soudure nécessaire.
Spécifications
Micromodule d'alimentation (PM06 v2)
Moteurs : 2207 KV1950
Empattement : 250 mm
Dimensions : 198 x 235 x 70 mm
Poids : 347g
Inclus
Cellule 250 en fibre de carbone avec matériel
Micromodule d'alimentation (PM06 v2)
Moteurs : 2207 KV1950
Accessoires en plastique 5"
Carte de gestion de l'alimentation entièrement assemblée avec ESC (BLHeli S ESC 20A)
Sangles de batterie
Remarque : la batterie LiPo n'est pas incluse.
Using the RFID Starter Kit
An Arduino board has now become ‘the’ basic component in the maker community. No longer is an introduction to the world of microcontrollers the preserve of the expert. When it comes to expanding the capabilities of the basic Arduino board however, the developer is still largely on his own. If you really want to build some innovative projects it’s often necessary to get down to component level. This can present many beginners with major problems. That is exactly where this book begins.
This book explains how a wide variety of practical projects can be built using items supplied in a single kit together with the Arduino board. This kit, called the 'RFID Starter Kit for Arduino' (SKU 17240) is not just limited to RFID applications but contains more than 30 components, devices and modules covering all areas of modern electronics.
In addition to more simple components such as LEDs and resistors there are also complex and sophisticated modules that employ the latest technology such as:
A humidity sensor
A multicolor LED
A large LED matrix with 64 points of light
A 4-character 7-segment LED display
An infra red remote-controller unit
A complete LC-display module
A servo
A stepper motor and controller module
A complete RFID reader module and security tag
On top of that you will get to build precise digital thermometers, hygrometers, exposure meters and various alarm systems. There are also practical devices and applications such as a fully automatic rain sensor, a sound-controlled remote control system, a multifunctional weather station and so much more.
All of the projects described can be built using the components supplied in the Elektor kit.
Elektor GREEN and GOLD members can download their digital edition here.
Not a member yet? Click here.
The RISC-V Open-Source Processor Architecture16 Boards and MCUs You Should Know
An FPGA-Based Audio Player with Equalizer (1)Mixing Digital Audio with an Arduino MKR Vidor 4000
Laser Head for Pico-Based Sand ClockDrawing with Light
Enter the STM32 Edge AI Contest
A Multi-Sensor Environmental Monitoring System for PlantsWireless Measurement of Water Supply and Light Conditions
Maixduino AI-Powered Automatic DoormanFace Detection with a Camera
Embedded Electronics 2024AI Is Set to Redefine the Industry
Charge-Based In-Memory Compute at EnCharge AI
AI Inferencing at 10 Times Lower Power and 20 Fold Lower Cost
Click Board Helps Develop and Train ML Models for Vibration Analysis
The Elektor Mini-WheelieA Self-Balancing Robot Kit
MCU, I See YouMCUViewer Open-Source Multiplatform Debugging Tool
USB 2.0 IsolatorElectrically Isolated Connections for USB Devices
Intervention Before DamagePredictive Maintenance in Practice
SPoE – Electromagnetic CompatibilitySingle-Pair with Power-Over-Ethernet Through the Eyes of EMC
Color TV: A Wonder of Its TimeCreating a New World
ECG Graph MonitoringAn Implementation with Hexabitz Modules and an STM32CubeMonitor
The Battle for AI at the Edge
HaLow Hits Record 16-km Wi-Fi Distance at 900 MHz
First CHERI RISC-V Embedded Chip and Early Access Programme
Third-Generation Wildfire Detection Uses Satellite Links
From Life’s ExperienceChoice Overload
Starting Out in Electronics……Continues Filtering and Controls Tone
Quasi-Analog ClockworkA Remake of an Elektor Classic
A Modular Approach to Sensor TestingThe ESP32-S3-Based Sensor Evaluation Board
2025: An AI OdysseyThe Rise of Foundation Models and Their Role in Democratizing AI
Raspberry Pi Standalone MIDI Synthesizer (1)Preparing a Platform for Some Edge AI Experiments
Err-lectronicsCorrections, Updates, and Readers’ Letters
Universal AI RISC-V Processor Does It All — CPU, GPU, DSP, FPGA
CEO Interview: Ventiva’s Thin and Cool Tech
Dual-Core Programming with a Raspberry Pi PicoVenture Into the World of Parallel Programming
Open-Source-Code mit Arduino IDE und PlatformIO
Autonomes Fahren: GPS, Accelerometer, Gyroskop
PS3-Controller
Mikrocontroller wie der Arduino und Einplatinenrechner wie der Raspberry Pi haben sich zu beliebten Komponenten entwickelt. Dritter im Bunde ist der ESP32 der Firma Espressif. Mikrocontroller dieser Baureihe zeichnen sich durch eine Vielzahl implementierter Funktionen aus, die bei einem Arduino konventioneller Prägung mit einem Atmel-AVR-Mikrocontroller erst mit weiterer Hardware möglich sind. Prominentes Beispiel sind hier die WiFi- und Bluetooth-Funktionalitäten. Gegenüber einem Raspberry Pi zeichnen sie sich durch einen deutlich geringeren Preis aus.
Allgemeine Informationen für die Realisierung eines Roboterauto-Projekts mit dem ESP32 sind leicht zu finden. Dabei handelt es sich aber oft nur um Ausführungen zu einem Teilaspekt, ohne inhaltliche oder funktionale Abstimmung. So ist nicht nur die Beschaffung der benötigten Informationen mühselig und zeitaufwändig, sie kann auch außerordentlich fehlerträchtig sein.
Ansatzpunkt dieses Buches ist, diese Lücke zu schließen. Es geht auf verschiedene Möglichkeiten eines Chassis ein, vermittelt nötige Kenntnisse und führt schrittweise von einer einfachen Motorsteuerung zu einem komplexen sensor- und sprachgesteuerten Roboterauto. Hacks rund um GPS und eine PlayStation 3 runden die Sache ab.
Inhalt
Bei der Reihenfolge der Kapitel wurde versucht – beginnend bei der Darstellung von grundlegenden Informationen – über die Lösung einfacher Aufgaben zu etwas anspruchsvolleren Techniken zu führen.
Der Mikrocontroller ESP32
Die Software erstellen
Die Stromversorgung
Rund um die Hardware
Das Chassis
Der Gleichstrommotor
Kabellose Steuerung über WiFi
Mit Sensoren Hindernisse erkennen
Eine eigene Roboterauto-App
Servo und Lichtsensor
GPS
Accelerometer / Gyroskop
PS3-Controller
Roboterauto-App
Hinweis zur Software
Die Dateien haben das Suffix (.cpp). Grund ist die Entwicklung mit PlatformIO. Mit Copy & Paste sollten sie auch in der Arduino-IDE verwendet werden können.
Contents
Projects
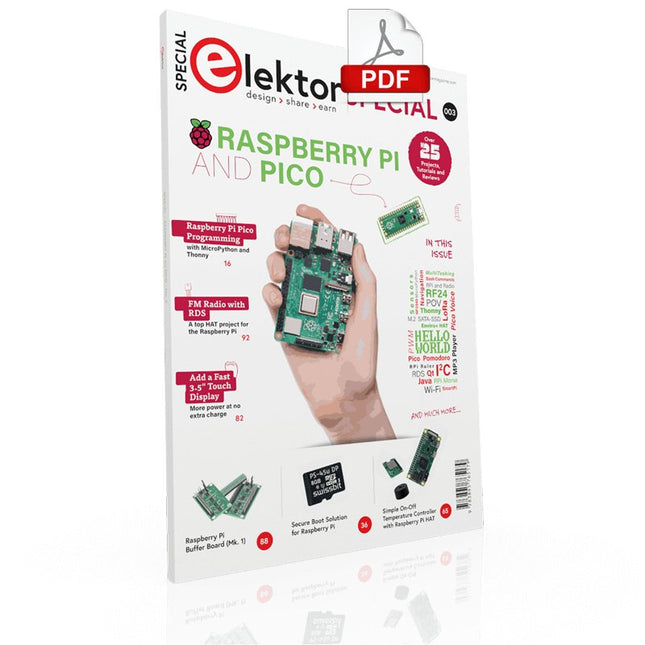
PicoVoiceVoice alienation and sound effects with the Raspberry Pi Pico
Navigation with Vibration Feedback
POV Display
Pulse Width Modulation (PWM) with the Raspberry Pi Pico
Wi-Fi with the Raspberry Pi Pico
'Hello World' from the Raspberry Pi Pico and RP2040A look at the Raspberry Pi Foundation’s first microcontroller
Simple On-Off Temperature Controller with Raspberry Pi HAT
Multitasking with the Raspberry PiShowcase: a traffic lights controller
The Raspberry Pi Ruler GadgetFun with a time-of-flight sensor
Raspberry Pi Buffer Board (Mk. 1)Never blow up the I/O again
FM radio with RDSA top HAT project for the Raspberry Pi
LoRa with the Raspberry Pi PicoFun with MicroPython!
Tutorials
Qt for the Raspberry Pi
Raspberry Pi Pico Programmingwith MicroPython and Thonny
Raspberry Pi Full StackRPi and RF24 at the heart of a sensor network
Raspberry Pi Bash Command Cheat Sheet
Community
Java on the Raspberry PiAn interview with Frank Delporte
Reviews
Introducing the New Raspberry Pi Pico W, H, and WH
Secure Boot Solution for Raspberry PiRetrofit security at a reasonable price
Review: SmartPi – Smart Meter Extension for Raspberry Pi
Review: The Enviro+ Raspberry Pi HATMeasuring environmental data with Raspberry Pi and the HAT Enviro+
Review: Meet the Raspberry Pi 4All new but still good?
Raspberry Pi Gets a Fast 3.5' Touch DisplayMore power at no extra charge
Book Launch: Raspberry Pi for Radio Amateurs
La plateforme ROS la plus populaire au monde
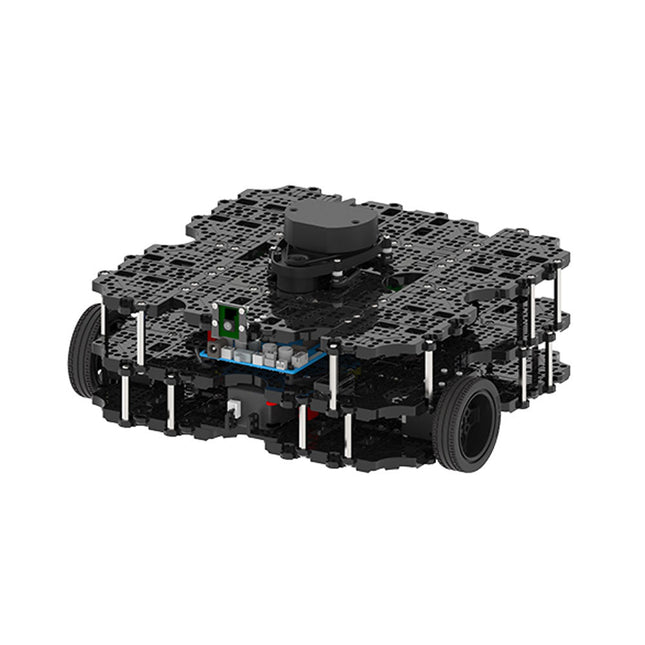
TurtleBot est le robot open source le plus populaire pour l'éducation et la recherche. La nouvelle génération de TurtleBot3 est un petit robot mobile, peu coûteux, entièrement programmable et basé sur ROS. Il est destiné à être utilisé pour l'éducation, la recherche, les loisirs et le prototypage de produits.
Coût abordable
TurtleBot a été développé pour répondre aux besoins économiques des écoles, des laboratoires et des entreprises. TurtleBot3 est le robot le plus abordable parmi les robots mobiles SLAM équipés d'un capteur de distance laser 360° LDS-01.
Norme ROS
La marque TurtleBot est gérée par Open Robotics, qui développe et maintient ROS. Aujourd'hui, ROS est devenu la plateforme de référence pour tous les roboticiens du monde. TurtleBot peut être intégré à des composants robotiques existants basés sur ROS, mais TurtleBot3 peut être une plateforme abordable pour ceux qui veulent commencer à apprendre ROS.
Extensibilité
TurtleBot3 encourage les utilisateurs à personnaliser sa structure mécanique à l'aide d'options alternatives : carte embarquée open source (en tant que carte de contrôle), ordinateur et capteurs. TurtleBot3 Waffle Pi est une plate-forme à deux roues à entraînement différentiel, mais sa structure et sa mécanique peuvent être personnalisées de nombreuses façons : voitures, vélos, remorques, etc. Développez vos idées au-delà de l'imagination avec différents SBC, capteurs et moteurs sur une structure évolutive.
Actionneur modulaire pour robot mobile
TurtleBot3 est capable d'obtenir des données spatiales précises en utilisant 2 DYNAMIXEL dans les articulations des roues. Les DYNAMIXEL de la série XM peuvent être utilisés selon l'un des 6 modes de fonctionnement (série XL : 4 modes de fonctionnement) : Mode de contrôle de la vitesse pour les roues, mode de contrôle du couple ou mode de contrôle de la position pour les articulations, etc. DYNAMIXEL peut même être utilisé pour fabriquer un manipulateur mobile qui est léger mais qui peut être contrôlé avec précision grâce au contrôle de la vitesse, du couple et de la position. DYNAMIXEL est un composant c?ur qui rend TurtleBot3 parfait. Il est facile à assembler, à entretenir, à remplacer et à reconfigurer.
Carte de contrôle ouverte pour ROS
La carte de contrôle est open-source au niveau du matériel et du logiciel pour la communication ROS. La carte de contrôle OpenCR1.0 est suffisamment puissante pour contrôler non seulement les capteurs DYNAMIXEL mais aussi les capteurs ROBOTIS qui sont fréquemment utilisés pour des tâches de reconnaissance de base de manière rentable. Différents capteurs tels que les capteurs tactiles, les capteurs infrarouges, les capteurs de couleur et bien d'autres sont disponibles. L'OpenCR1.0 possède un capteur IMU à l'intérieur de la carte afin d'améliorer la précision du contrôle pour d'innombrables applications. La carte dispose d'alimentations de 3,3 V, 5 V et 12 V pour renforcer les gammes d'appareils informatiques disponibles.
Source ouverte
Le matériel, le micrologiciel et le logiciel de TurtleBot3 sont des logiciels libres, ce qui signifie que les utilisateurs sont invités à télécharger, modifier et partager les codes sources. Tous les composants de TurtleBot3 sont fabriqués en plastique moulé par injection afin de réduire les coûts, mais les données de CAO 3D sont également disponibles pour l'impression 3D.
Spécifications
Vitesse de translation maximale
0.26 m/s
Vitesse de rotation maximale
1.82 rad/s (104.27 deg/s)
Charge utile maximale
30 kg
Taille (L x L x H)
281 x 306 x 141 mm
Poids (+ SBC + batterie + capteurs)
1.8 kg
Seuil de montée
Max 10 mm
Durée d'utilisation prévue
2 h
Temps de charge prévu
2 h 30 m
SBC (ordinateur à carte unique)
Raspberry Pi 4 (2 Go RAM)
MCU
32-bit ARM Cortex-M7 with FPU (216 MHz, 462 DMIPS)
Contrôleur à distance
RC-100B + BT-410 Set (Bluetooth 4, BLE)
Actionneur
XL430-W210
LDS (capteur de distance laser)
360 Laser Distance Sensor LDS-01 or LDS-02
Caméra
Raspberry Pi Camera Module v2.1
IMU
Gyroscope 3 axesAccelerometer 3 axes
Connecteurs d'alimentation
3.3 V/800 mA5 V/4 A12 V/1 A
Connecteurs d'extension
GPIO 18 brochesArduino 32 broches
Périphériques
3x UART, 1x bus CAN, 1x SPI, 1x I²C, 5x CAN, 4x 5-pin OLLO
Ports DYNAMIXEL
3x RS485, 3x TTL
Audio
Plusieurs séquences programmables
LED programmables
4x User LED
LED d'état
1x Board status LED1x Arduino LED1x Power LED
Boutons et interrupteurs
2x boutton poussoir, 1x bouton Reset, 2x DIPswitch
Batterie
Lithium polymer 11.1 V 1800 mAh / 19.98 Wh 5C
Connexion PC
USB
Mise à jour du micrologiciel
par USB / par JTAG
Adaptateur d'alimentation (SMPS)
Entrée: 100-240 VCA 50/60 Hz, 1.5 A @maxSortie: 12 VCC, 5 A
Téléchargements
Programmation de robots ROS
GitHub
Manuel électronique
Communauté
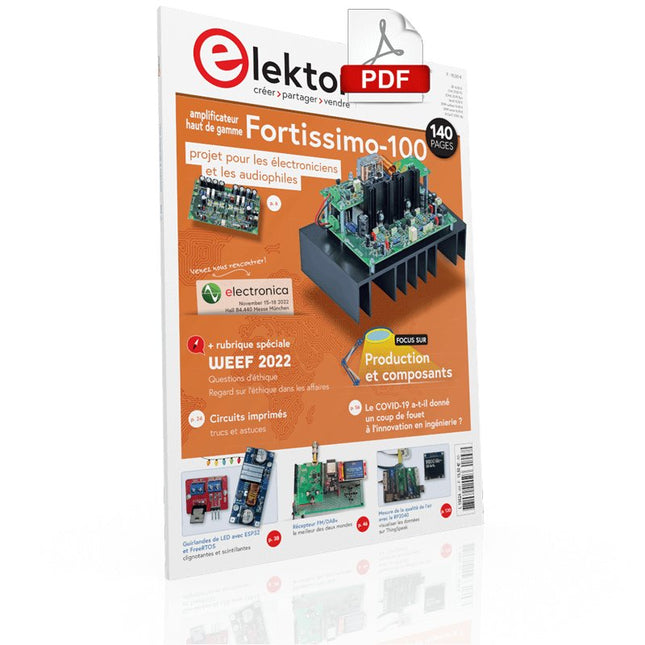
Le téléchargement intégral de ce numéro est disponible pour nos membres GOLD et GREEN sur le site Elektor Magazine !Pas encore membre ? Cliquez ici.Le haut de gamme au cœur du labo ElektorAmplificateur haut de gamme Fortissimo-100Étage de sortie audio entièrement symétrique avec 100/190 WVérification de la fréquence des quartz et des circuits accordésAstuces, bonnes pratiques et autres informations utilestrucs et astuces pour circuits impriméssouder - et alors ?un regard approfondi sur la technologie de soudage modernecommande de porte de garage par Bluetooth à réponse rapideOuvrez votre porte avec votre smartphonecontrôleur de diode idéalecircuits à diodes à faible dissipation de puissanceguirlandes de LED avec ESP32 et FreeRTOSclignotantes et scintillantesdémarrer en électronique...avec plaisir, on continue avec les Zenerrécepteur FM/DAB+le meilleur des deux mondessur le vifElectronica Obscuraprocédé sans fil de débogage de micrologicielsTampon circulaire et serveur web sur l'ESP32Le COVID-19 a-t-il donné un coup de fouet à l'innovation en ingénierie ?Composants et solutions innovants de 2022Ersa i-CON TRACE – la station de soudage connectée pour professionnelsInfographiquesqu'allons-nous faire de toute cette informatique ?Comment piloter l'afficheur E-Paper d'Ynvisibleinnovation de tous les instants chez InnoFaithentretien avec Walter Arkesteijnautomatisation industriellerétrofit IdO facile et évolutifQt pour le Raspberry Piguide pas à pas pour la configuration du framework d'interface graphique utilisateurLes connecteurs linéaires ultra-plats facilitent la gestion de données multi-signauxintelligents - innovants - rentablesles FPGA GateMate conçus et fabriqués en Allemagnedes outils pour soutenir le développement de capteurs à faible coûtfusible réarmable CTPdrôle de composant, la sérieSortie analogique isolée pour Arduino Unovisite à domicile… Découvre le Thérémineelectronica fast forward 2022 — une initiative d'Elektoréquipe et calendrierradiogoniométrieretrouver les capteurs météo sans fil égarésestimer le bruit interne d'un circuit intégréméthode simpleQuestions d'éthiqueInitié par le WEEFÉthique et profit, un mariage de raisonEntretien avec le professeur Stefan Heinemannl'index WEEF 2023logiciel de calcul de filtresOutils de conception de filtres analogiquesÉteins-moi cette télé !avec TV-B-GoneMesure de la qualité de l'air avec le RP2040elekterminalInitiation à Python 3extrait du chapitre : bibliothèque Wand et traitement numérique des imagesSOLARPUNKun avenir prometteurHexadoku
Diese Ausgabe steht allen GOLD- und GREEN-Mitgliedern auf der ElektorMagazine-Website zum Download bereit!
Sie sind noch kein Mitglied? Hier klicken!
Die Open-Source-Prozessorarchitektur RISC-V16 Boards und MCUs, die Sie kennen sollten
Audio-Player mit FPGA und EqualizerTeil 1. Digitale Audiosignale mischen mit einem MKR Vidor 4000 von Arduino
Laserkopf für Pico-basierte SanduhrZeichnen mit Licht
Nehmen Sie teil am STM32 Edge AI Contest!
Umweltüberwachung von Pflanzen mit mehreren SensorenDrahtlose Messung der Wasserversorgung und Lichtverhältnisse
Maixduino: Automatischer KI-TüröffnerGesichtserkennung mit einer Kamera
Embedded-Elektronik 2024KI wird die Branche neu definieren
Ladungsbasiertes In-Memory Compute bei EnCharge AI
KI-Inferencing bei 10-fach geringerer Leistungsaufnahme zu 20-fach geringeren Kosten
Click-Board hilft bei der Entwicklung und dem Training von ML-Modellen für die Schwingungsanalyse
Der Elektor Mini-WheelieEin Bausatz für einen selbstbalancierenden Roboter
MCU, ich sehe dich!MCUViewer, ein Open-Source-Multiplattform-Debugging-Werkzeug
USB-2.0-IsolatorGeräte galvanisch isoliert per USB verbinden
Eingriff vor dem SchadenPredictive Maintenance in der Praxis
SPoE - Elektromagnetische VerträglichkeitSingle-Pair mit Power-over-Ethernet im EMV-Fokus
Retro-TechnikWie das Farbfernsehen eine neue Welt schuf
EKG-MonitorMit Hexabitz-Modulen und einem STM32CubeMonitor
Der Kampf um KI at the Edge
HaLow erreicht Rekorddistanz von 16 km für WLAN bei 900 MHz
Erster CHERI RISC-V-Embedded Chip und Early Access Programm
Die dritte Generation der Waldbrandfrüherkennung nutzt Satellitenverbindungen
Aus dem Leben gegriffenDie Qual der Wahl
Aller Anfang......ist nicht schwer: Wir setzen die Filterung und Klangregelung fort.
Riesen-LED-UhrNeuauflage eines Elektor-Klassikers
Ein modularer Ansatz für die SensorprüfungDas Sensor Evaluation Board mit ESP32-S3
2025: Eine Odyssee in die KIDer Aufstieg der Basismodelle und ihre Rolle bei der Demokratisierung der KImocratizing AI
Standalone MIDI-Synthesizer mit Raspberry PTeil 1: Eine Plattform für Edge-KI-Experimente vorbereiten
Projekt 2.0Korrekturen, Updates und Leserbriefe
CPU, GPU, DSP, FPGA; ein universeller KI-RISC-V-Prozessor kann alles!
CEO-Interview: Ventivas dünne und kühle Technologie
Dual-Core-Programmierung beim Raspberry Pi PicoEinstieg in die Welt der parallelen Programmierung