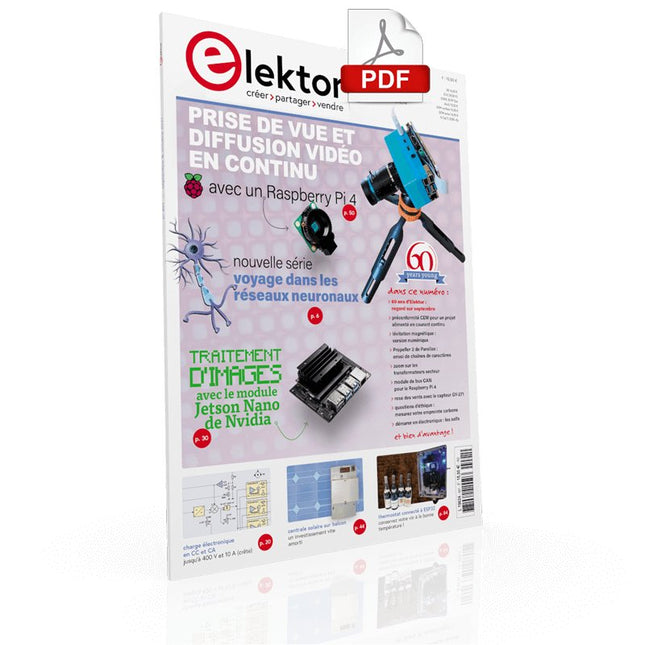
VOYAGE DANS LES RÉSEAUX NEURONAUX (1ÈRE PARTIE)Les neurones artificielsTEST DE PRÉCONFORMITÉ CEM POUR UN PROJET ALIMENTÉ EN COURANT CONTINUPartie 1 : RSIL double continuCHARGE ÉLECTRONIQUE EN CC ET CAJusqu'à 400 V et 10 A (crête)DÉMARRER EN ÉLECTRONIQUE (9)N'ayez pas peur du choc... un peu de « self control » suffit !TRAITEMENT D'IMAGES AVEC LE MODULE JETSON NANO DE NVIDIA (1ÈRE PARTIE)Matériel et logicielZOOM SUR LES TRANSFORMATEURS SECTEURComportement transitoire à l'allumage et l'extinction« YES WE CAN » AVEC PICAN 3Module de bus CAN pour le Raspberry Pi 4CENTRALE SOLAIRE SUR BALCONUn investissement vite amortiPRISE DE VUE ET DIFFUSION VIDÉO EN CONTINU AVEC UN RASPBERRY PI 4La caméra Raspberry Pi HQ en actionUTILISATION D'ÉCRANS DANS LES PROJETS RASPBERRY PIExtrait : écrans à diodes électroluminescentes organiques (OLED)PROPELLER 2 DE PARALLAX (4)Envoi de chaînes de caractères60 ANS D'ELEKTORRegard sur septembreDANS L'ANTRE DE…Menno van der Veen et de ses tubes amplificateursCIRCUITS HYBRIDESROSE DES VENTS AVEC LE CAPTEUR GY-271Ou pourquoi il faut faire des huit pour calibrer un capteurMESUREZ VOTRE EMPREINTEÉlectronique et émissions de gaz à effet de serreTHERMOSTAT CONNECTÉ À ESP32Conservez votre vin à la bonne température !LÉVITATION MAGNÉTIQUE, VERSION NUMÉRIQUEComparateur analogique remplacé par un ESP32 PicoULTIMATE ARDUINO UNO HARDWARE MANUAL - FR TRANSLATIONExtrait : chargeur d'amorçage du microcontrôleur principalMICROPYTHON POUR L'ESP32 ET SES COPAINSPartie 2 : piloter facilement les écrans matricielsCARTE MADMACHINE SWIFTIOUn langage récent pour du matériel tout nouveauSUR LE VIFPassions incertainesHEXADOKUCasse-tête pour elektorniciens
Diese Ausgabe steht allen GOLD- und GREEN-Mitgliedern auf der ElektorMagazine-Website zum Download bereit!
Sie sind noch kein Mitglied? Hier klicken!
USB-MessadapterStrom und Signalqualität von USB-Anschlüssen testen
4...20 mA Stromausgang für Arduino UnoEine zuverlässige, EMI-unempfindliche Stromschleifenschnittstelle
Automatische StaubsaugersteuerungHalten Sie den Arbeitsbereich Ihrer Werkzeuge sauber
DDS-Generator mit ATtiny
Opamp-Tester V2Neue Platine – nun auch für SMDs geeignet
550-mW-„Lamp“-AudioverstärkerDer warme Klang von Röhren – ganz einfach
SicherungswächterSicherung mit Blink-LED überwachen
Hochwertiger RIAA-VorverstärkerHolen Sie das Beste aus Ihren Vinyl-Schallplatten heraus!
Drahzahlkalibrator für PlattenspielerEin Arduino-basierter Stroboskopgenerator mit 100–120 Hz
Infrarot-fernbedienbarer DimmerSteuern Sie Ihre Halogen- oder LED-Stehleuchte mühelos und mit Stil
Wie man switch…case mit Strings in C++/Arduino IDE verwendet
Magnetfindermit einfachem Hall-Effekt-Sensor
Intelligenter Einschaltknopf für Raspberry PiEine Lösung für Raspberry Pi bis zum Modell 4
Essenzielle Maker-TippsProfessionelle Einblicke für den Maker-Alltag
Praktische Projekte mit dem 555-TimerGleichstrommotorsteuerung und Reaktionszeitschallungen
Einfacher AC-Last-Ein-MonitorEnergie sparen mit einem einfachen Gerät
Powerbanks parallel schaltenEine durchgehende Stromversorgung für drei Tage
VFO bis 15 MHzMit Raspberry Pi Pico
Geigen-Stimmgerät mit ATtiny202
Elektor Classics: Video-Eingangsverstärker für S/W-Fernseher
Kapazitätsmesser20 pF bis 600 nF
Quasi-analoges Uhrwerk MkIIZwei LED-Ringe für Stunden und Minuten
Sie können alles tun, was Sie wollen(mit dem Arduino-Ökosystem an Ihrer Seite)
Neon-Würfel mit Glimmlampen
Elektor Classics: Video-Verstärker
Inspirierende Hardware-Designs für Ihre ESPs
Elektor Classics: RTTY-Abgleichanzeige
RGB-LEDs mit integrierter SteuerschaltungLicht mit Präzision: ICLEDs setzen Maßstäbe
Experiment: Auf dem Weg zu einem Mixed-Signal-Theremin?Moderne Time-of-Flight-Sensoren im Zusammenspiel mit dem zeitlosen XR2206-Analoggenerator
ESP32-Audio-Transceiver-Board (Teil 1)SD-Karten-WAV-Player-Demo
Infografiken: Schaltungen & Schaltungsdesign 2025
Kleiner Audio-MixerEinfaches und vielseitiges skalierbares Design
Intelligenter Treppenlicht-TimerEffiziente Lichtsteuerung zur Reduzierung des Energieverbrauchs
Machen Sie Ihre Rollläden smartVelux-Hardware steuern mit ESP32 und MQTT
Solid-State-FußwärmerEnergieeffizienter Komfort
Ist der M5Stamp Fly Quadcopter der nächste Tello?
Erhöhung der WLAN-Reichweite des ESP32-C3 SuperMiniEine einfache und wirkungsvolle Antennenmodifikation
ZD-8968 Heißluft-LötstationEin preisgünstiges Arbeitstier oder nur heiße Luft?
Parksensor-TesterDefekte beim PDC-System am Auto finden
USB to S/PDIF InterfaceDigital audio output for computer, laptop, tablet or smartphone
Practical ESP32 Multitasking (4)Binary semaphores
A Wireless Temperature Sensor for the Nixie Bargraph ThermometerA multipurpose solution with a design trick
Multitasking with Raspberry PiShowcase: a traffic lights controller
Timer for Headphone Amplifier
Open-Network Weather Station Mk.2Part 2: Software
Home Automation Made EasyWith ESPHome, Home Assistant & MySensors
The Storage CRTPeculiar Parts, the series
Artificial Intelligence for Beginners (3)A stand-alone neural network
Programming PICs from the Ground UpAssembler routine to output a sine wave
IKEA Lamp HackEquipping an inexpensive IKEA lamp with NeoPixel LEDs and WLAN
Don't Let Your Hobby Project Collect Dust in a CornerSupply-side time management and spiral development
Starting Out in Electronics (4)Easier than imagined!
Homelab Tours: The Vinyl CutterReturning to the golden age of LPs
The 8-Bit Microcontroller and BeyondInterview with Tam Hanna
Small Circuits RevivalFrom the Elektor suggestions box
Review: Owon OW18E Bluetooth Multimeter
InteractiveCorrections & Updates || Questions & Answers
Steeped in ElectronicsLead-free soldering and EU regulatory zeal
Promising Project: New 50 Hz – 2 MHz LCR meterAccuracy and ease of use
Error AnalysisTips on FMEA, High Current, and More
Developer's ZoneTips & Tricks, Best Practices and Other Useful Information
Review: Siglent SDL1020X Programmable DC Electronic Load
High-Voltage Power Supply with Curve TracerGenerate voltages up to 400 V and trace characteristics curves for valves and transistors
Hexadoku 2009EL
Analogue Electronics DesignCase Study #2 — Part 1: Analogue filter theory
The Elektor StoreNever expensive, always surprising
How to Draw a Circuit Diagram
Ce cours complet de programmation de microcontrôleurs STM32 comprend un manuel, un kit de composants, des projets pratiques et une formation en ligne approfondie. Il est idéal pour apprendre étape par étape la programmation de systèmes embarqués avec Arduino grâce à une approche pratique.
Une introduction pratique aux systèmes embarqués avec le STM32
Ce cours s'adresse aux débutants dans le domaine des systèmes embarqués qui recherchent une méthode structurée et basée sur des exemples pour se lancer. Un kit de composants est inclus ; il contient notamment des LED, des résistances, des interrupteurs, des capteurs, des actionneurs, des afficheurs, une plaque d'essai (breadboard) et des fils de connexion. Ces éléments sont utilisés tout au long du cours pour illustrer des exemples d'applications.
Aucune expérience préalable d'Arduino ou du développement de systèmes embarqués n'est requise. Chaque section propose des exemples pratiques et des mini-projets conçus pour consolider les concepts clés et encourager une exploration plus approfondie. À l'issue de la formation, vous serez capable non seulement de reproduire les exemples présentés, mais aussi de les enrichir grâce à vos propres idées et applications.
Que allez-vous apprendre ?
Programmation de microcontrôleurs STM32 en C/C++ avec l'IDE Arduino
Utilisation des entrées/sorties numériques, lecture de boutons et encodeurs, commande de LED et relais
Lecture des entrées analogiques, tensions et capteurs analogiques
Génération de signaux analogiques et PWM
Utilisation des communications série comme UART, I²C et SPI pour piloter des afficheurs et lire des capteurs numériques et cartes SD
Gestion du temps
Utilisation des interruptions
Entrées capteurs en temps réel et contrôle via boutons, LED et afficheurs
Commande d’actionneurs comme relais et servomoteurs
Déboguer des programmes à l'aide de points d'arrêt et de l'exécution pas à pas
À qui s’adresse ce cours ?
Étudiants et autodidactes explorant les systèmes embarqués
Makers et passionnés d’IoT souhaitant améliorer leurs compétences en hardware
Formateurs et enseignants à la recherche de matériel pédagogique prêt à l’emploi
Contenu de la boîte
Accès au cours complet sur la plateforme Elektor Academy Pro
Carte microcontrôleur STM32 NUCLEO-F411RE
Livre : Arduino for STM32
Fichiers de projet téléchargeables pour chaque module
Boîte de composants :
2× LED, rouge, 5 mm
LED, verte, 5 mm
3× résistance, 470 Ω, 0,25 W
LDR
Potentiomètre, 10 kΩ, linéaire
Bouton-poussoir
Module encodeur rotatif
Module relais
Capteur DHT22 (température & humidité)
Afficheur 7 segments 4 digits compatible TM1637
MPU-6050 IMU avec connecteurs
Afficheur OLED I²C compatible SSD1306
Adaptateur carte micro SD avec connecteur
Buzzer
Micro servo SG90
Écran TFT SPI 240×320 compatible ILI9341
20× fils jumper
Breadboard
Touch-GUI voor ESP32 en Raspberry & cografische gebruikersinterface met de LittlevGL-bibliotheek
“Niet zomaar een project”vraaggesprek met Gábor Kiss-Vámosi, ontwikkelaar van LittlevGL
Capaci-metermet tweecijferig LED-display in dekatron-stijl
Hoe... een mechanisch contact of schakelaar ontdendereneen schakelaar is open of gesloten – toch?
Developer's Zonetips & trucs, vakkunstigheden en andere nuttige informatie
Uitbreidbaar milieumonitorsysteempubliceert gegevens op IoT-platforms
Multitasking met de ESP32Multitasking met de ESP32 taakgeoriënteerd programmeren met FreeRTOS en de Arduino IDE
Interactiefcorrecties & updates || vragen & antwoorden
Autoverlichting tunenlegaal, illegaal – maakt wél uit!
Review Toolcraft digitaal soldeerstation
Arduino Pro IDEeen eerste indruk
Twee warmtebeeldcamera’s vergeleken
Uit het leven gegrepende inrichting van een lab en werkplaats
Monsanto MAN1 LED-displayvreemde onderdelen
Theetimereen experiment met energy harvesting
Eenfase 1 kW AC-motorsturingdrie bedrijfsmodi: perioderegeling, fase-afsnijding en fase-aansnijding
Snel 3,5'-touchscreen voor de Raspberry Pipresteert beter voor hetzelfde geld
Oost West Lab Besteen blik in het allerheiligste, waar onbevoegden geen toegang hebben...
Eerste stappen met RISC-Vhet LoFive-board onder de loep
LoRa-Tracker: een uitdaging voor het labproblemen en oplossingen bij de ontwikkeling van elektronica
Met de vos in het IoT (2)aanmelden in het Sigfox-netwerk
Alle begin......hoeft niet zo moeilijk te zijn
Analoge elektronica ontwerpencase-study #1 – deel 1: MEMS-microfoon... test-een-twee-drie
Wie het kleine niet eertuit de ideeënbus van Elektor
In het kort: teksten voor microcontrollersspaar geheugen met compressie
In de schijnwerpers: de autonome autooverzicht van de stand van de techniek
Leidende start-ups en innovatoren over “Innovation 4.0” in München
Lego Electronic anno 1968elektronisch speelgoed fascineert na 50 jaar nog steeds
Beyond ElectronicsThe MX3D Bridge Senses the City
Hexadoku
DRIVING MOTORS WITH H-BRIDGESAn Introduction to DC, Stepper, and Brushless Motors
THE ELEKTOR LAB TEAMOur Approach, Preferred Tools, and More
RASPBERRY PI AS A KVM REMOTE CONTROLPi-KVM Software Test
IQAUDIO CODEC ZEROA Sound Card for the Raspberry Pi Family
THE PIKVM PROJECT AND LESSONS LEARNEDInterview with Maxim Devaev (Developer, PiKVM)
AUTONOMOUS VEHICLE WITH 2D LIDARESP32 Pico Interprets Data from the Lidar Module THE RASPBERRY PI ZERO 2 W GOES QUAD-CORE NOTES FROM THE 2021 WORLD ETHICAL ELECTRONICS FORUM
MOTOR CONTROLHow the Complexity of Motor Control Is Simplified
LARGE ELECTRIC MOTORSBasic Principles and Useful Information GETTING STARTED WITH THE ESP32-C3 RISC-V MCU
PROTECT YOURSELF AND OTHERS!DIY Master Power Switch for the Lab Bench
CREATE GUIS WITH PYTHON (PART 2)Spy name chooser
PRODUCTRONICA FAST FORWARD 2021 WINNERSExciting Technologies and Creative Engineering Solutions
VERSATILE SERVO TESTERCheck Behavior When There’s No Datasheet
MODBUS OVER WLAN (PART 2)Software for the Modbus TCP WLAN Module
UNDERSTANDING THE NEURONS IN NEURAL NETWORKS (PART 3)Practical Neurons
INSIDE AN OPEN-SOURCE PROCESSORSample Chapter: Lattice and Xilinx FPGA Results
STARTING OUT IN ELECTRONICSWe Are Not Yet Done with the Coil
ERR-LECTRONICSCorrections, Updates and Readers’ Letters
COLOR TO SOUNDHow to Read Out a Color Sensor via I2C
BATTLAB-ONEMeasure and Optimize the Battery Life of IoT Devices
SIMPLE EARTH-LEAKAGE TRACERTesting Isolation of Mains Supply
POVERTY AND ELECTRONICSSustainable Development Goal 1
HEXADOKUThe Original Elektorized Sudoku
L'Andonstar ADSM302 est un microscope numérique polyvalent doté d'un écran LCD 5 pouces intégré et d'une sortie HDMI pour des images d'une netteté exceptionnelle en Full HD (1080p). Avec un capteur de 3 mégapixels, un grossissement jusqu'à ~560x et deux lumières LED réglables, il rend visibles les détails les plus fins, ce qui le rend idéal pour l'inspection des circuits imprimés, les travaux de soudure, l'analyse des bijoux ou des insectes.
Caractéristiques
Moniteur LCD 5" réglable avec angle d'inclinaison réglable
Capture vidéo et photo haute résolution
Table large avec hauteur libre confortable
Support métallique stable et lourd
Support de levage haut (26 cm)
Roues de réglage de la mise au point et de la hauteur
Boutons sur le moniteur + télécommande
Sorties AV, USB, HDMI
Stockage sur carte SD <32 GB
Spécifications
Capteur d’image
Capteur HD de 3 mégapixels
Sortie vidéo
1080p Full HD (via HDMI)720p (via PC)
Format vidéo
Lecture en temps réel via HDMI sans enregistrementEnregistrement MJPEG via le logiciel PC/Mac
Agrandissement
Jusqu'à 560 fois (moniteur HDMI 22')
Résolution photo
12M (voir les formats de pixels dans le tableau suivant)
Format photo
JPEG
Plage de mise au point
5 à 22 cm
Taux de rafraîchissement
Jusqu'à 30 f/s sous une luminosité de 600 Lux
Interface de sortie vidéo
HDMI/AV
Stockage
Carte microSD, jusqu'à 32 Go
Support PC
Windows XP/7/8/10Logiciel PC avec mesureMacOS testé avec succès sous OSX avec OBSvoir la vidéo ci-dessous
Source d’alimentation
5 V CC
Source de lumière
2x LED avec le support
Taille de l’écran
5 pouces (12,7 cm)
Taille du support
20 x 12 x 26,5 cm
Résolution
Photos capturées
4032 x 3024
3648 x 2736
3264 x 2448
2592 x 1944
2048 x 1536
640 x 480
1920 x 1080
1280 x 960
1280 x 720*
Vidéos
1920 x 1080
640 x 480*
* (USB avec logiciel)
Inclus
1x Andonstar ADSM302 Microscope numérique
1x Support métallique avec 2 LED
1x Câble USB
1x Câble HDMI
1x Adaptateur
1x Télécommande AI
1x Instructions
Téléchargements
Manuel
Logiciel
Open-Source-Code mit Arduino IDE und PlatformIO
Autonomes Fahren: GPS, Accelerometer, Gyroskop
PS3-Controller
Mikrocontroller wie der Arduino und Einplatinenrechner wie der Raspberry Pi haben sich zu beliebten Komponenten entwickelt. Dritter im Bunde ist der ESP32 der Firma Espressif. Mikrocontroller dieser Baureihe zeichnen sich durch eine Vielzahl implementierter Funktionen aus, die bei einem Arduino konventioneller Prägung mit einem Atmel-AVR-Mikrocontroller erst mit weiterer Hardware möglich sind. Prominentes Beispiel sind hier die WiFi- und Bluetooth-Funktionalitäten. Gegenüber einem Raspberry Pi zeichnen sie sich durch einen deutlich geringeren Preis aus.
Allgemeine Informationen für die Realisierung eines Roboterauto-Projekts mit dem ESP32 sind leicht zu finden. Dabei handelt es sich aber oft nur um Ausführungen zu einem Teilaspekt, ohne inhaltliche oder funktionale Abstimmung. So ist nicht nur die Beschaffung der benötigten Informationen mühselig und zeitaufwändig, sie kann auch außerordentlich fehlerträchtig sein.
Ansatzpunkt dieses Buches ist, diese Lücke zu schließen. Es geht auf verschiedene Möglichkeiten eines Chassis ein, vermittelt nötige Kenntnisse und führt schrittweise von einer einfachen Motorsteuerung zu einem komplexen sensor- und sprachgesteuerten Roboterauto. Hacks rund um GPS und eine PlayStation 3 runden die Sache ab.
Inhalt
Bei der Reihenfolge der Kapitel wurde versucht – beginnend bei der Darstellung von grundlegenden Informationen – über die Lösung einfacher Aufgaben zu etwas anspruchsvolleren Techniken zu führen.
Der Mikrocontroller ESP32
Die Software erstellen
Die Stromversorgung
Rund um die Hardware
Das Chassis
Der Gleichstrommotor
Kabellose Steuerung über WiFi
Mit Sensoren Hindernisse erkennen
Eine eigene Roboterauto-App
Servo und Lichtsensor
GPS
Accelerometer / Gyroskop
PS3-Controller
Roboterauto-App
Hinweis zur Software
Die Dateien haben das Suffix (.cpp). Grund ist die Entwicklung mit PlatformIO. Mit Copy & Paste sollten sie auch in der Arduino-IDE verwendet werden können.
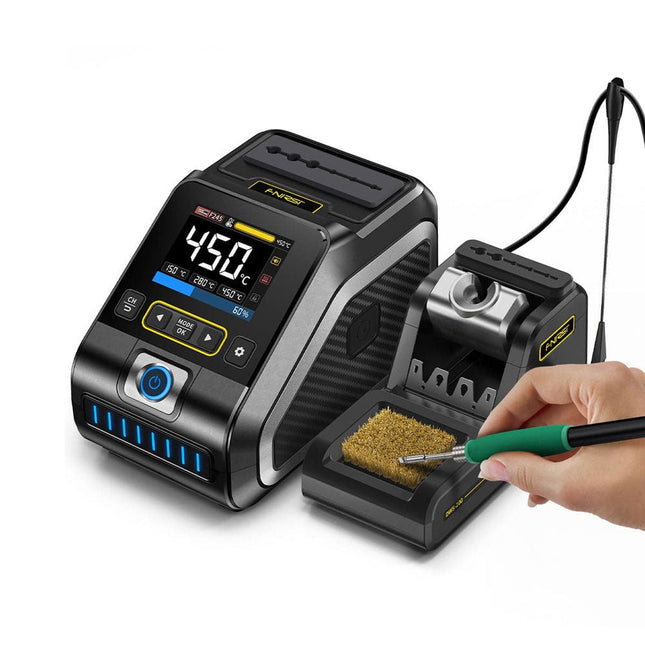
La FNIRSI DWS-200 est une puissante station de soudage intelligente de 200 W, idéale pour les applications de soudage électronique. Alimenté par une alimentation à découpage, il fonctionne sans problème avec une large plage de tension d'entrée de 100 à 240 V. La station offre une plage de température réglable de 100°C à 450°C et permet de basculer facilement entre °C et °F.
Pour améliorer l'efficacité, il prend en charge jusqu'à trois valeurs de température prédéfinies et peut se connecter à un support de fer à souder pour l'activation du mode veille. La station dispose également d'un mode de courbe de température dynamique pour la surveillance des données en temps réel, garantissant des performances précises et cohérentes dans les tâches de soudage exigeantes.
Features
Puissance de sortie maximale de 200 W, permettant un chauffage rapide
Large entrée de tension adaptative de 100 à 240 V
Écran TFT couleur HD de 2,8 pouces avec contrôle intelligent
Plusieurs groupes prédéfinis pour basculer rapidement entre différents paramètres
Prend en charge les types de poignées à souder F245 et F210, offrant ainsi une flexibilité pour différentes applications de soudage
Mode veille en temps réel pour prolonger la durée de vie de la panne à souder
Surveillance multimode en temps réel de l'état de l'alimentation et de la température, améliorant ainsi la sécurité et la précision
Spécifications
Puissance maximale
200 W (maximum)
Plage de température
100°C~450°C
Écran
Écran couleur TFT HD de 2,8 pouces
Temps de chauffage
1 seconde
Temps de fusion
3 secondes
Tension d'entrée
100-240 V (CA)
Fusible d'entrée
3A
Type de poignée à souder
F245
Dimensions (station)
156 x 96 x 103 mm
Poids (station)
475 g
Inclus
1x FNIRSI DWS-200 station de soudage
1x Poignée à souder F245
6x Pannes à souder (B, KU, K, C2, I, JS)
1x Câble de connexion
2x Coups de main
1x Câble d'alimentation (UE)
Téléchargements
Manual
Firmware V1.3
The Elektor LoRa NodeVersatile, long-range, 868-MHz remote control with state feedback and STM32 Inside
InteractiveCorrections & Updates || Questions & Answers
Analogue Electronics DesignCase Study #1 — Section 2: Preamplifier optimized for MEMS microphone
My IoT Button: A Button for the WebPart 1: IoT architecture
BASIC for the ESP32 and ESP8266Programming with Annex WiFi RDS
ESP32 Doorbell via Telegram“The UPS Man Always Rings Once”
Small Circuits RevivalCapita Selecta from the Elektor Project Suggestions Box
My First LoRaWANWith Blue Pill, LoRa Breakout Board and The Things Network
Elektor Connexions 2003EL
“A Strong Supporter of Open Internet”Interview with Wienke Giezeman, Initiator of The Things Network
The Meadow F7 BoardA great board for .NET developers
Practical ESP32 Multitasking (2)Task priorities
Sigfox and the IoT (3)First steps on the network
Raspberry Pi Bash Command Cheat Sheet
Europe's Most Successful Start-up Accelerator?HighTechXL, Eindhoven, The Netherlands
Review: The Enviro+ RPi-HATMeasure air quality with a Raspberry Pi and the Enviro+ HAT
Steeped in Electronicsordering components from Ukraine and Russia
Review: Andonstar AD407Better than its predecessor?
Lab, Sweet LabA glimpse of The Holy Place — no unauthorized entry.
Optical Probe for OscilloscopesMeasure brightness fluctuations of lighting systems
The 'TABULA' Project - An UpdateTangibles with user feedback
How-To Calculate the Prospective Short-Circuit Current or PSCCand choose the proper circuit breaker
TMS1000 Series Microcontrollers
Peculiar Parts, the series
Starting Out in Electronics (2)
Easier than imagined!
Developer's ZoneTips & Tricks, Best Practices and Other Useful Information
Locating Wayward Wires
Track and trace concealed and defective cables with ease and certainty
Review: Joy-IT DMSO2D72 Portable 3-in-1 Oscilloscope
Homebrew PC for the Electronics LabTips on Component Choice and Construction
The Elektor ‘Intelekt’ Chess Computer (1981)Tiny Chess 86 ported to the Intel 8088
Beyond ElectronicsPCB Art - Pushing the Limits of Industrial Manufacturing
Diese Ausgabe steht allen GOLD- und GREEN-Mitgliedern auf der ElektorMagazine-Website zum Download bereit!
Sie sind noch kein Mitglied? Hier klicken!
DIY-SolarakkusÜber den Selbstbau von Energiespeichern für Solaranlagen
Solarmodul-SimulatorFür Test und Optimierung von MPP-Trackern und Invertern
Der STM32-Edge-KI-WettbewerbEntdecken Sie den neuen STM32N6 und nehmen Sie am Wettbewerb um 5.000 € teil!
Erweiterung der BandlückeWarum gibt es so viel Interesse an SiC und GaN?
Power-Bank für NotebooksVerlängern Sie das Leben Ihres alten Laptops!
Medizinische RoboterÜberwindung technischer und regulatorischer Hürden
Frostwächter für ObstpflanzenMit Temperatur-Datenlogger
Das analoge DingDer Arduino des Analog-Computings?
Sparsames NetzrelaisMit über 90% Leistungsreduzierung
Verbesserung der DC-Last ET5410A+Keep cool and be quiet!
electronica 2024 im Rückblick
Elektromagnetische VerträglichkeitEMV kurz und bündig!
Aller Anfang......muss nicht schwer sein: Aktive Filter
Verlustleistung reduzieren mit AbleitkondensatorenEin cleverer Einsatz von kapazitiver Reaktanz
Preiswerter 12-Bit-Digital-Analog-Wandler MCP4725Mit EEPROM-Feature für sicheres Einschaltverhalten
Fnirsi LCR-ST1, die intelligente LCR-SMD-Pinzette
Test- und Messlabor mit Raspberry PiDas Wichtigste zuerst: Der ADC
Elektronischer LastwiderstandEin Projekt aus der Kiste
2025: Eine Odyssee in die KIEinige Projekte für das neue Jahr
Projekt-Update: Modulares DC-Leistungsmessgerät AmpVolt v2.0100 Ampere und mehr!
Projekt 2.0
Ethische Transparenz sichtbar gemachtErgebnisse der Umfrage 2024 von Ethics in Electronics
Elektor Audio-DSP FX-Prozessor-BoardTeil 2: Anwendungen erstellen
A Practical Guide to AI, Python, and Hardware Projects
Welcome to your BeagleY-AI journey! This compact, powerful, and affordable single-board computer is perfect for developers and hobbyists. With its dedicated 4 TOPS AI co-processor and a 1.4 GHz Quad-core Cortex-A53 CPU, the BeagleY-AI is equipped to handle both AI applications and real-time I/O tasks. Powered by the Texas Instruments AM67A processor, it offers DSPs, a 3D graphics unit, and video accelerators.
Inside this handbook, you‘ll find over 50 hands-on projects that cover a wide range of topics—from basic circuits with LEDs and sensors to an AI-driven project. Each project is written in Python 3 and includes detailed explanations and full program listings to guide you. Whether you‘re a beginner or more advanced, you can follow these projects as they are or modify them to fit your own creative ideas.
Here’s a glimpse of some exciting projects included in this handbook:
Morse Code Exerciser with LED or BuzzerType a message and watch it come to life as an LED or buzzer translates your text into Morse code.
Ultrasonic Distance MeasurementUse an ultrasonic sensor to measure distances and display the result in real time.
Environmental Data Display & VisualizationCollect temperature, pressure, and humidity readings from the BME280 sensor, and display or plot them on a graphical interface.
SPI – Voltmeter with ADCLearn how to measure voltage using an external ADC and display the results on your BeagleY-AI.
GPS Coordinates DisplayTrack your location with a GPS module and view geographic coordinates on your screen.
BeagleY-AI and Raspberry Pi 4 CommunicationDiscover how to make your BeagleY-AI and Raspberry Pi communicate over a serial link and exchange data.
AI-Driven Object Detection with TensorFlow LiteSet up and run an object detection model using TensorFlow Lite on the BeagleY-AI platform, with complete hardware and software details provided.